Running from source
This page is in progress Please check back later for additional changes |
Running your very own instance of OWOT from source is relatively straightforward. The source code is available here.
While the instructions for running your own instance are detailed on the Github project's README, this article will go in depth on how to get your instance up and running.
Software Requirements
Our World of Text is built on Node.js which is a JavaScript runtime for your desktop. Despite what people may say about Node online, it's a robust runtime that has evolved since its release in 2009. It's capable of dealing with a large number of requests per second and handles I/O operations very well.
Node.js
Our World of Text has been tested on versions as early as v16. If you haven't installed Node.js already, you can go for the LTS release which works fine for essentially everybody.
Git
This is not required. This is only good for those who want to quickly fetch updates from the repository or get into OWOT development. If you choose to proceed with this route, you may download the latest version of Git.
Downloading the Source Code
Once you've got the software installations out of the way, you can now start downloading the source code so that you can run it.
There are a few ways of doing this:
Through Git
First, you'll have to open command prompt and navigate to a directory to place your source code. You do not need to create a directory, but it's recommended to do so. If you prefer, you may type mkdir nwot and then run cd nwot to enter it.
Next, you will have to run the following command: git clone https://github.com/system2k/NodeWorldOfText.git nodeworld
Once that is done, you may now enter the directory. You can do so by entering cd nodeworld
If you could not get git to work all this time or decided not to use it, you may just download a zip file from the GitHub repository.
From the GitHub Website
Visit the repository:
To download the zip file, click the green Code button and click Download ZIP.
Navigate to where the zip file is and extract it to a proper directory (i.e. not your Pictures or Desktop although there's no harm).
You should be all set for this part.
Through wget
If you're on Linux, you may run this command: wget https://github.com/system2k/NodeWorldOfText/archive/master.zip -O nodeworld.zip
Extract the contents by running: unzip nodeworld.zip
You should now see a file named NodeWorldOfText-master somewhere in your directory. It's up to you what to name it or where to put it.
Through curl
If you're on Linux (or Mac if you're unfortunate), you may run: curl -L -O https://github.com/system2k/NodeWorldOfText/archive/master.zip -o nodeworld.zip
Extract the contents by running: unzip nodeworld.zip
You should now see a file named NodeWorldOfText-master somewhere in your directory. It's up to you what to name it or where to put it.
Getting the Server Ready
By this point, you should already ensure that you're inside the source code directory. It should be the directory containing runserver.js and all the backend files.
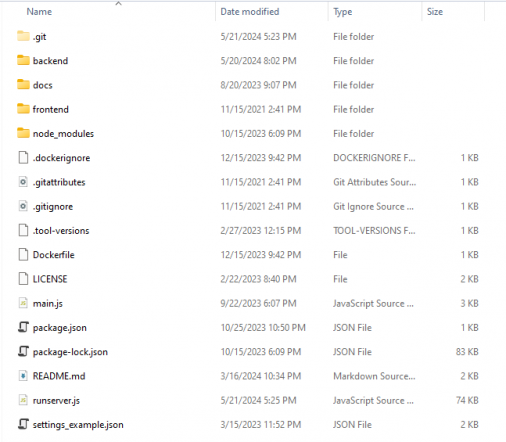
Installing packages via NPM
The backend of OWOT uses NPM (Node Package Manager) to manage its packages.
You must ensure the packages are installed by running npm install
Running the server for the first time
Once the packages are installed, you can start up the server by running node main.js
Your terminal should now look like this:
C:\Users\Username\nwot\nodeworld>node main.js
Starting process...
Starting up...
Created the settings file at [../nwotdata/settings.json]. You must configure the settings file and then start the server back up again.
Full path of settings:C:\Users\Username\nwot\nwotdata\settings.json
Process exited. [0; 0x00000000]

C:\Users\Username\nwot\nodeworld>
The data directory has been generated (named nwotdata) in the parent directory. Navigate to the parent directory and enter the nwotdata directory. You will find a file named settings.json which contains various settings including the port number.
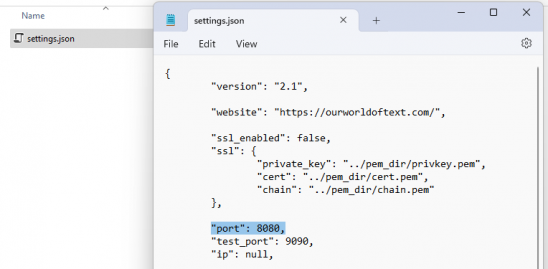
You may change the port number to any value you want. In most cases, it's fine to leave it as it is but you may change it to, for example, 11001.
Once you've changed the settings you want, you may close the text editor and go back to your terminal to run the server again.
You'll be prompted to create a superuser account. A superuser account is an administrator account that has the highest privileges and can be used to claim the main world (/).
C:\Users\Username\nwot\nodeworld>node main.js
Starting process...
Starting up...
Loaded libs
Loading page files
Starting server...
Loading static files...
Loading HTML templates...
Compiling HTML templates...
Handling previous error logs (if any)
Initializing server...
You've just installed the server,
which means you don't have any superusers defined.
Would you like to create one now? (yes/no):
If you'd prefer not to create one, enter no. Else, enter yes. You'll then be prompted to type in the credentials of your new superuser account.
It's highly recommended to create one as you won't be able to claim the main world without one.
Would you like to create one now? (yes/no): yes
Username: admin
Password: **************
Password (again): **************
Superuser created successfully.

OWOT Server is running
Address: ::
Port: 8080
Once you're past that stage, the server should now be running locally on your machine.
You will be able to access your local instance of OWOT here: http://localhost:8080
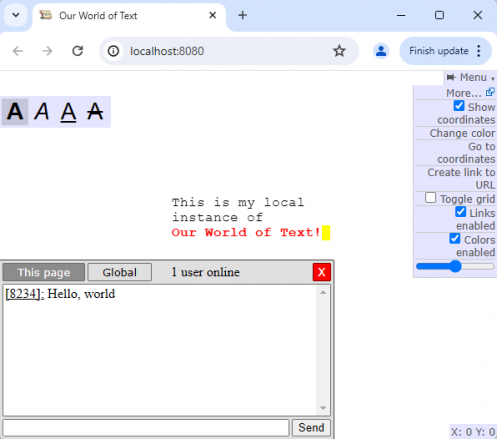
Should you need to close down your server, go back to your terminal and either press Ctrl+C or enter stop
Any time you need to start your server back up, just go back to your nodeworld directory enter node main.js in the terminal again.
Managing your local instance
Once your local instance is up and running, it's time to log in to your superuser account and claim the main world.
Logging in to your superuser account
To log in to your account, hover over the menu and press More...
Next, press Login and login with your superuser credentials.
You'll then be presented with your profile where you can claim and view your worlds (http://localhost:8080/accounts/profile/).
Since you're logged in as a superuser account, you may press the Claim button to claim the main world.

Once the main page has been claimed, you can go back to the main page and protect areas.
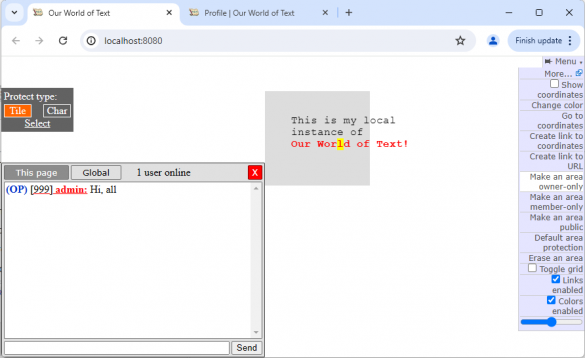
Using the administrator panel
The admin panel is an interface used to manage certain parts of the site.
It can be used to quickly access a world's config page, download a world, manage user chat tags, set the announcement, and more.
To access it, go to your profile and click on Admin Panel (http://localhost:8080/administrator/).
We'll be setting an announcement to test how it works. Scroll down to the Set Announcement section and enter a message. Press Set.
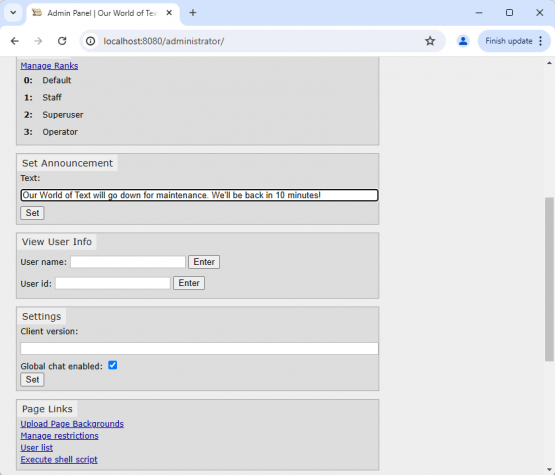
You may go back to the main page to see the announcement in action.
Configuring and using the traffic monitor
The traffic monitor displays a comprehensive log of the network and server activities. This is useful for troubleshooting server issues and analyzing attacks on your server.
To set up the traffic monitor, close the server which can be done through the admin panel (scroll down to Manage Server and click Close), or by going to the running terminal and pressing Ctrl+C or entering stop
Navigate to your nwotdata directory and open settings.json in a text editor.
Scroll down to the monitor block and change enabled from false to true.
Set the port to a number different from your server's port (8081 for example) and set the user/pass under credentials to something super secure.
Set the redirect to the following value: http://localhost:8081 - you may have to change 8081 into the port you used if you're using a different port.
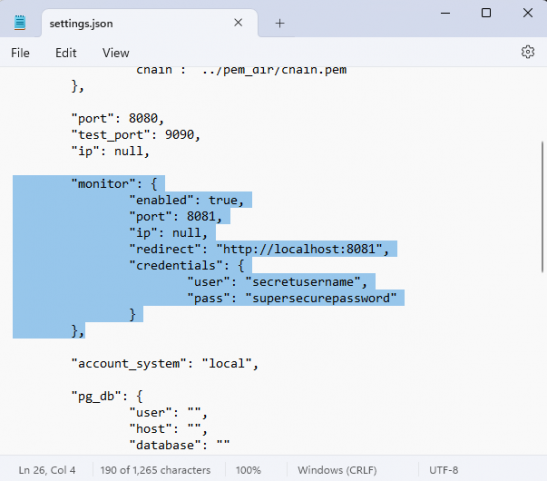
Save the file and start the server back up.
Go back to your profile and click Monitor (http://localhost:8080/administrator/monitor/). It should redirect you to the traffic monitor.
The monitor will display what's going on within the server, including new client connections, writes and I/O activity, the backpressure, database status, and the first four characters of messages sent through the /tell chat command.
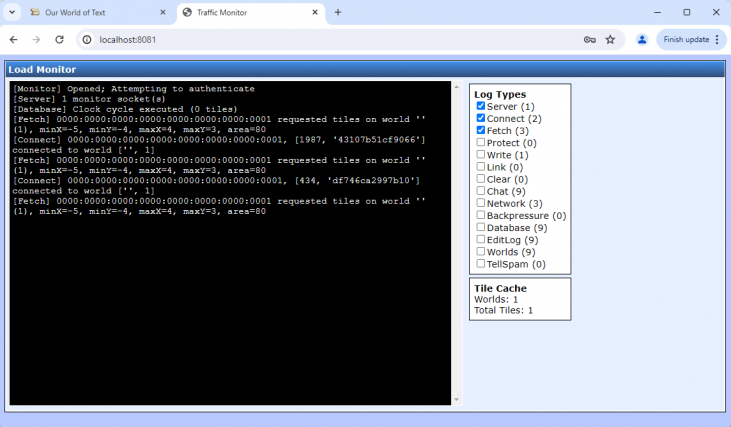
You'll be able to manage the log types that are displayed using the Log Types panel.
